<?xml version="1.0" encoding="utf-8"?>
<feed xmlns="http://www.w3.org/2005/Atom">
  <title>象牙の森</title>
  
  <subtitle>大道至简,行稳致远</subtitle>
  <link href="https://ivoryforest.github.io/atom.xml" rel="self"/>
  
  <link href="https://ivoryforest.github.io/"/>
  <updated>2022-10-09T15:48:06.093Z</updated>
  <id>https://ivoryforest.github.io/</id>
  
  <author>
    <name>象牙の森</name>
    
  </author>
  
  <generator uri="https://hexo.io/">Hexo</generator>
  
  <entry>
    <title>nginx日志格式化以及打印输入参数结果输出</title>
    <link href="https://ivoryforest.github.io/nginx-log-format.html"/>
    <id>https://ivoryforest.github.io/nginx-log-format.html</id>
    <published>2022-10-09T06:45:06.000Z</published>
    <updated>2022-10-09T15:48:06.093Z</updated>


  </entry>
  
  <entry>
    <title>nginx添加限流配置以及黑白名单</title>
    <link href="https://ivoryforest.github.io/nginx-ratelimit-and-blockip.html"/>
    <id>https://ivoryforest.github.io/nginx-ratelimit-and-blockip.html</id>
    <published>2022-10-09T05:39:11.000Z</published>
    <updated>2022-10-18T15:56:48.207Z</updated>


    <category term="nginx" scheme="https://ivoryforest.github.io/tags/nginx/"/>
    
  </entry>
  
  <entry>
    <title>centos上安装mongodb</title>
    <link href="https://ivoryforest.github.io/build-mongodb-on-centos.html"/>
    <id>https://ivoryforest.github.io/build-mongodb-on-centos.html</id>
    <published>2022-10-02T10:13:30.000Z</published>
    <updated>2022-10-09T15:44:34.291Z</updated>
    
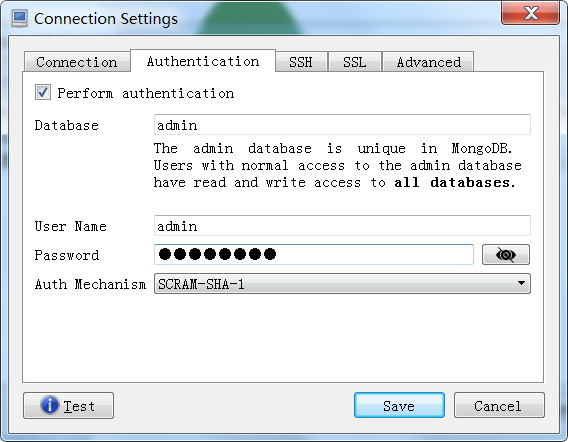
    <content type="html"><![CDATA[<h2 id="简介"><a href="#简介" class="headerlink" title="简介"></a>简介</h2><p>项目打算集成mongodb，把一些不定结构的数据存储到mongodb中。</p><p>本文记录在centos上安装mongodb上，并且使用robo-3T连接mongodb遇到的问题。</p><h2 id="安装mongodb"><a href="#安装mongodb" class="headerlink" title="安装mongodb"></a>安装mongodb</h2><p>选择版本，目前最新版本都已经到6.0，当然我连接mongodb的客户端为robo-3T，高级版本不支持。最新版本的robo-3T为1.4版，后续就转为Studio 3T了。robo-3T支持的最高的mongodb版本为4.2，所以我们就选择mongodb 4.2版本即可。</p><p>从<a href="https://www.mongodb.com/docs/v4.2/tutorial/install-mongodb-on-red-hat/">官方教程</a>上直接可以看到安装流程，创建&#x2F;etc&#x2F;yum.repos.d&#x2F;mongodb-org-4.2.repo文件，写入内容</p><figure class="highlight plaintext"><table><tr><td class="gutter"><pre><span class="line">1</span><br><span class="line">2</span><br><span class="line">3</span><br><span class="line">4</span><br><span class="line">5</span><br><span class="line">6</span><br></pre></td><td class="code"><pre><span class="line">[mongodb-org-4.2]</span><br><span class="line">name=MongoDB Repository</span><br><span class="line">baseurl=https://repo.mongodb.org/yum/redhat/$releasever/mongodb-org/4.2/x86_64/</span><br><span class="line">gpgcheck=1</span><br><span class="line">enabled=1</span><br><span class="line">gpgkey=https://www.mongodb.org/static/pgp/server-4.2.asc</span><br></pre></td></tr></table></figure><p>如果你用的是amazon aws上的主机，则改为</p><figure class="highlight plaintext"><table><tr><td class="gutter"><pre><span class="line">1</span><br><span class="line">2</span><br><span class="line">3</span><br><span class="line">4</span><br><span class="line">5</span><br><span class="line">6</span><br></pre></td><td class="code"><pre><span class="line">[mongodb-org-4.2]</span><br><span class="line">name=MongoDB Repository</span><br><span class="line">baseurl=https://repo.mongodb.org/yum/amazon/2/mongodb-org/4.2/x86_64/</span><br><span class="line">gpgcheck=1</span><br><span class="line">enabled=1</span><br><span class="line">gpgkey=https://www.mongodb.org/static/pgp/server-4.2.asc</span><br></pre></td></tr></table></figure><p>然后执行命令即可安装</p><figure class="highlight plaintext"><table><tr><td class="gutter"><pre><span class="line">1</span><br></pre></td><td class="code"><pre><span class="line">sudo yum install -y mongodb-org</span><br></pre></td></tr></table></figure><p>结束后，配置文件在&#x2F;etc&#x2F;mongod.conf，可以按需修改配置。如下命令操作mongodb服务</p><figure class="highlight plaintext"><table><tr><td class="gutter"><pre><span class="line">1</span><br><span class="line">2</span><br><span class="line">3</span><br><span class="line">4</span><br><span class="line">5</span><br><span class="line">6</span><br></pre></td><td class="code"><pre><span class="line">sudo systemctl start mongod   # 启动</span><br><span class="line"></span><br><span class="line">sudo systemctl stop  mongod   # 停止</span><br><span class="line"></span><br><span class="line">sudo systemctl restart  mongod   # 重启</span><br><span class="line"></span><br></pre></td></tr></table></figure><h2 id="创建登陆用户"><a href="#创建登陆用户" class="headerlink" title="创建登陆用户"></a>创建登陆用户</h2><p>这时使用robo-3T直接连接mongodb是连接不通的，需要通过认证</p><p>分别执行命令</p><figure class="highlight shell"><table><tr><td class="gutter"><pre><span class="line">1</span><br><span class="line">2</span><br><span class="line">3</span><br><span class="line">4</span><br><span class="line">5</span><br><span class="line">6</span><br><span class="line">7</span><br><span class="line">8</span><br><span class="line">9</span><br><span class="line">10</span><br></pre></td><td class="code"><pre><span class="line">./mongo  # 进入mongodb shell</span><br><span class="line"></span><br><span class="line">use admin;</span><br><span class="line"></span><br><span class="line">db.createUser(&#123;user:&quot;admin&quot;,pwd:&quot;admin&quot;,roles:[&#123;role:&quot;root&quot;,db:&quot;admin&quot;&#125;]&#125;); #  新建用户admin/admin, 权限为root</span><br><span class="line"></span><br><span class="line">db.auth(&quot;admin&quot;, &quot;admin&quot;); # 验证是否创建成功，返回1则表示成功</span><br><span class="line"><span class="meta prompt_"></span></span><br><span class="line"><span class="meta prompt_"># </span><span class="language-bash">db.updateUser(<span class="string">&quot;admin&quot;</span>,&#123;<span class="built_in">pwd</span>:<span class="string">&quot;admin&quot;</span>&#125;); <span class="comment"># 更改密码指令</span></span></span><br><span class="line"></span><br></pre></td></tr></table></figure><h2 id="配置robo-3T连接mongodb"><a href="#配置robo-3T连接mongodb" class="headerlink" title="配置robo-3T连接mongodb"></a>配置robo-3T连接mongodb</h2><p>在编辑robo-3T配置的时候，除了连接地址配置外，还需要配置Authentication选项卡，勾选中<code>Perform authentication</code>，设置认证表以及认证用户即可。如图</p><p><img src="/../images/1665292948049.jpg" alt="robo-3T 认证"></p>]]></content>


    <summary type="html">&lt;h2 id=&quot;简介&quot;&gt;&lt;a href=&quot;#简介&quot; class=&quot;headerlink&quot; title=&quot;简介&quot;&gt;&lt;/a&gt;简介&lt;/h2&gt;&lt;p&gt;项目打算集成mongodb，把一些不定结构的数据存储到mongodb中。&lt;/p&gt;
&lt;p&gt;本文记录在centos上安装mongodb上，并且使</summary>


    <category term="mongodb" scheme="https://ivoryforest.github.io/tags/mongodb/"/>
    
    <category term="centos" scheme="https://ivoryforest.github.io/tags/centos/"/>
    
  </entry>
  
  <entry>
    <title>基于 vscode + wnmp + xdebug3 搭建PHP开发环境</title>
    <link href="https://ivoryforest.github.io/build-php-dev-env.html"/>
    <id>https://ivoryforest.github.io/build-php-dev-env.html</id>
    <published>2022-08-21T14:57:25.000Z</published>
    <updated>2022-08-22T06:01:14.951Z</updated>
    
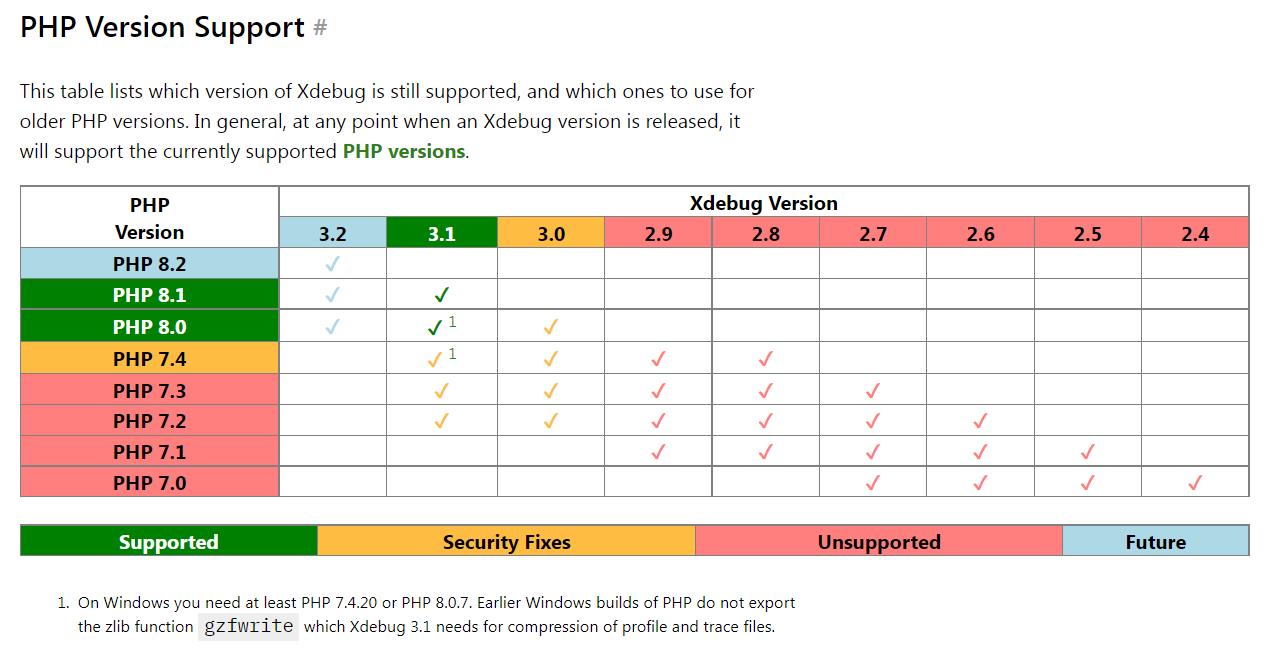
    <content type="html"><![CDATA[<h2 id="简介"><a href="#简介" class="headerlink" title="简介"></a>简介</h2><p>前几天同事接了个私单，基于drupal开发的一个论坛系统，但是由于之前没有接触过PHP，并且项目比较紧急，所以邀请我和他一起研究这个。</p><p>作为一个资深Javaer，至于为什么要去研究PHP？我只能说，赚钱嘛，不丢人。</p><h2 id="安装必备软件"><a href="#安装必备软件" class="headerlink" title="安装必备软件"></a>安装必备软件</h2><h4 id="安装-wnmp"><a href="#安装-wnmp" class="headerlink" title="安装 wnmp"></a>安装 wnmp</h4><p>wnmp是 window+nginx+mariaDB+php 的组合，比较适合新手。wnmp安装比较简单，直接在百度上搜索wnmp，最终找到了 <a href="https://phpcj.org/wnmp/">清风的网络空间</a>，在百度网盘链接里面直接有wnmp一键安装包，下载解压即可。解压后目录里面有<code>运行程序.bat</code>,<code>关闭程序.bat</code>，顾名思义，可以一键启动，一键关闭。</p><p>解压之后，找到php目录，把php目录加入到环境变量中，然后执行命令 php -v，可以查看PHP的版本，目前最新的PHP版本为7.4.6。</p><h4 id="安装-xdebug"><a href="#安装-xdebug" class="headerlink" title="安装 xdebug"></a>安装 xdebug</h4><p>Xdebug是一个开放源代码的PHP程序调试器(即一个Debug工具)，可以用来跟踪，调试和分析PHP程序的运行状况。</p><p>在xdebug官网上发现xdebug对php有版本要求，<a href="https://xdebug.org/docs/compat">版本支持</a></p><p><img src="/../images/20220822135543.jpg" alt="PHP Version Support"></p><p>可以最下方看到，对php7.4必须最低到7.4.20以上，所以必须重装php。在<a href="https://www.php.net/downloads">PHP官网下载</a>，目前php7.4最高版本为php7.4.30。直接下载，然后替换wnmp下面的php，其中php目录下的ext目录和php.ini文件可以保留，因为都是7.4的依赖，一般可以正常使用。</p><p>在上面版本支持中可以发现PHP7.4匹配的是xdebug3.1，在<a href="https://xdebug.org/download/historical">下载页面</a>下载对应的版本，然后改名为php_xdebug.dll放到php目录下ext文件夹中。</p><p>修改php.ini，在最下面添加，具体的目录位置，根据自己目录来修改</p><figure class="highlight ini"><table><tr><td class="gutter"><pre><span class="line">1</span><br><span class="line">2</span><br><span class="line">3</span><br><span class="line">4</span><br><span class="line">5</span><br><span class="line">6</span><br><span class="line">7</span><br><span class="line">8</span><br></pre></td><td class="code"><pre><span class="line"><span class="section">[Xdebug]</span></span><br><span class="line"><span class="attr">zend_extension</span>=<span class="string">&quot;E:/software/wnmp/wnmp_php7/php/ext/php_xdebug.dll&quot;</span></span><br><span class="line"><span class="attr">xdebug.mode</span>=debug</span><br><span class="line"><span class="attr">xdebug.start_with_request</span>=<span class="literal">yes</span></span><br><span class="line"><span class="attr">xdebug.out_dir</span>=<span class="string">&quot;E:/software/wnmp/wnmp_php7/tmp&quot;</span></span><br><span class="line"><span class="attr">xdebug.log</span>=<span class="string">&quot;E:/software/wnmp/wnmp_php7/logs/xdebug.log&quot;</span></span><br><span class="line"><span class="attr">xdebug.log_level</span>=<span class="number">7</span></span><br><span class="line"><span class="attr">xdebug.show_local_vars</span>=<span class="number">0</span></span><br></pre></td></tr></table></figure><h4 id="安装vscode以及相关PHP插件"><a href="#安装vscode以及相关PHP插件" class="headerlink" title="安装vscode以及相关PHP插件"></a>安装vscode以及相关PHP插件</h4><p>在<a href="https://code.visualstudio.com/">vscode官网</a>中，可以直接下载安装。安装完之后，在vscode扩展中安装如下插件</p><ul><li>xdebug.php-debug</li><li>xdebug.php-pack</li><li>zobo.php-intellisense</li></ul><p>安装完成之后，修改php-debug的配置，上面有个在setting.json中编辑选项，修改变量php.debug.executablePath为自己php.exe所在目录的值，最终我的如下</p><figure class="highlight json"><table><tr><td class="gutter"><pre><span class="line">1</span><br><span class="line">2</span><br><span class="line">3</span><br></pre></td><td class="code"><pre><span class="line"><span class="punctuation">&#123;</span></span><br><span class="line">  <span class="attr">&quot;php.debug.executablePath&quot;</span><span class="punctuation">:</span> <span class="string">&quot;E:\\software\\wnmp\\wnmp_php7\\php\\php.exe&quot;</span><span class="punctuation">,</span></span><br><span class="line"><span class="punctuation">&#125;</span></span><br></pre></td></tr></table></figure><h4 id="开始调试"><a href="#开始调试" class="headerlink" title="开始调试"></a>开始调试</h4><p>修改wnmp目录下 nginx&#x2F;conf&#x2F;conf.d&#x2F;<a href="http://www.conf/">www.conf</a> 文件，修改root指向</p><figure class="highlight plaintext"><table><tr><td class="gutter"><pre><span class="line">1</span><br><span class="line">2</span><br><span class="line">3</span><br><span class="line">4</span><br><span class="line">5</span><br><span class="line">6</span><br><span class="line">7</span><br><span class="line">8</span><br><span class="line">9</span><br><span class="line">10</span><br><span class="line">11</span><br><span class="line">12</span><br><span class="line">13</span><br><span class="line">14</span><br><span class="line">15</span><br><span class="line">16</span><br><span class="line">17</span><br><span class="line">18</span><br><span class="line">19</span><br><span class="line">20</span><br><span class="line">21</span><br><span class="line">22</span><br><span class="line">23</span><br><span class="line">24</span><br><span class="line">25</span><br><span class="line">26</span><br><span class="line">27</span><br><span class="line">28</span><br><span class="line">29</span><br></pre></td><td class="code"><pre><span class="line">server &#123;</span><br><span class="line"></span><br><span class="line">    listen       80;</span><br><span class="line">    server_name  localhost;</span><br><span class="line"></span><br><span class="line">    access_log  logs/www.access.log  main;</span><br><span class="line"></span><br><span class="line">    #root   www;</span><br><span class="line">    root F:\cms_code\drupal-9.4.5;  # 改为项目目录</span><br><span class="line">    index  index.html index.htm index.php;</span><br><span class="line"></span><br><span class="line">    location / &#123;</span><br><span class="line">        try_files $uri $uri/ /index.php$is_args$args;</span><br><span class="line">    &#125;</span><br><span class="line"></span><br><span class="line">    error_page  404              /404.html;</span><br><span class="line"></span><br><span class="line">    error_page   500 502 503 504  /50x.html;</span><br><span class="line">    location = /50x.html &#123;</span><br><span class="line">        root   html;</span><br><span class="line">    &#125;</span><br><span class="line"></span><br><span class="line">    location ~ \.php$ &#123;</span><br><span class="line">        try_files $uri =404;</span><br><span class="line">        fastcgi_pass   127.0.0.1:9000;</span><br><span class="line">        include        fastcgi.conf;</span><br><span class="line">    &#125;</span><br><span class="line"></span><br><span class="line">&#125;</span><br></pre></td></tr></table></figure><p>重启服务，然后在VS Code项目中打上断点，然后打开浏览器即可进入开发调试了。</p><p>这样PHP的开发环境就已经配置好了。这里留一个别人的视频：<a href="https://www.bilibili.com/video/BV1p94y1d75L?spm_id_from=333.337.search-card.all.click&vd_source=496374e95de061ec773892e6274185a7">php调试（vscode+xdebug3）单步调试</a></p>]]></content>


    <summary type="html">&lt;h2 id=&quot;简介&quot;&gt;&lt;a href=&quot;#简介&quot; class=&quot;headerlink&quot; title=&quot;简介&quot;&gt;&lt;/a&gt;简介&lt;/h2&gt;&lt;p&gt;前几天同事接了个私单，基于drupal开发的一个论坛系统，但是由于之前没有接触过PHP，并且项目比较紧急，所以邀请我和他一起研究这个。&lt;/p</summary>


    <category term="PHP" scheme="https://ivoryforest.github.io/tags/PHP/"/>
    
    <category term="wnmp" scheme="https://ivoryforest.github.io/tags/wnmp/"/>
    
    <category term="xdebug" scheme="https://ivoryforest.github.io/tags/xdebug/"/>
    
  </entry>
  
  <entry>
    <title>使用 Hexo + Butterfly + GitHub Pages 搭建个人博客</title>
    <link href="https://ivoryforest.github.io/build-blog-hexo-butterfly.html"/>
    <id>https://ivoryforest.github.io/build-blog-hexo-butterfly.html</id>
    <published>2022-08-13T13:56:25.000Z</published>
    <updated>2022-08-21T17:11:14.356Z</updated>
    
    <content type="html"><![CDATA[<h2 id="简介"><a href="#简介" class="headerlink" title="简介"></a>简介</h2><p>Hexo 是一个快速、简洁且高效的博客框架。Hexo 使用 Markdown（或其他渲染引擎）解析文章，在几秒内，即可利用靓丽的主题生成静态网页。</p><p>Butterfly 是Hexo的一款精美主题，能让你的博客增色不少，并且文档齐全。</p><p>GitHub Pages 是免费的静态站点。</p><p>所以你只需要动动手指，就可以免费拥有一个属于自己的精美博客。</p><h2 id="开始"><a href="#开始" class="headerlink" title="开始"></a>开始</h2><h4 id="前期准备"><a href="#前期准备" class="headerlink" title="前期准备"></a>前期准备</h4><p>在安装前，需要先安装下列应用程序</p><ul><li>nodejs(Node.js 版本需不低于 10.13，建议使用 Node.js 12.0 及以上版本)</li><li>git</li></ul><p>在 <a href="https://hexo.io/zh-cn/docs/index.html">Hexo官方文档</a> 中有介绍，这里就不多做说明。</p><h4 id="安装-Hexo"><a href="#安装-Hexo" class="headerlink" title="安装 Hexo"></a>安装 Hexo</h4><p>执行命令即可完成安装 Hexo</p><figure class="highlight powershell"><table><tr><td class="gutter"><pre><span class="line">1</span><br></pre></td><td class="code"><pre><span class="line">npm install <span class="literal">-g</span> hexo<span class="literal">-cli</span></span><br></pre></td></tr></table></figure><p>安装 Hexo 完成后，请执行下列命令，Hexo 将会在指定文件夹中新建所需要的文件。</p><figure class="highlight powershell"><table><tr><td class="gutter"><pre><span class="line">1</span><br><span class="line">2</span><br><span class="line">3</span><br></pre></td><td class="code"><pre><span class="line">hexo init &lt;folder&gt;</span><br><span class="line"><span class="built_in">cd</span> &lt;folder&gt;</span><br><span class="line">npm install</span><br></pre></td></tr></table></figure><p>继续执行命令，启动服务器</p><figure class="highlight powershell"><table><tr><td class="gutter"><pre><span class="line">1</span><br><span class="line">2</span><br></pre></td><td class="code"><pre><span class="line">hexo g  <span class="comment"># 编译生成</span></span><br><span class="line">hexo s  <span class="comment"># 启动服务</span></span><br></pre></td></tr></table></figure><p>默认情况下，访问网址为： <a href="http://localhost:4000/">http://localhost:4000/</a></p><h4 id="安装butterfly"><a href="#安装butterfly" class="headerlink" title="安装butterfly"></a>安装butterfly</h4><p>这里可以参考一下 <a href="https://butterfly.js.org/posts/21cfbf15/">Butterfly安装文档</a>。</p><p>执行命令</p><figure class="highlight powershell"><table><tr><td class="gutter"><pre><span class="line">1</span><br></pre></td><td class="code"><pre><span class="line">git clone <span class="literal">-b</span> master https://github.com/jerryc127/hexo<span class="literal">-theme-butterfly</span>.git themes/butterfly</span><br></pre></td></tr></table></figure><p>并修改Hexo根目录下的_config.yml，把主题改为butterfly。</p><figure class="highlight yaml"><table><tr><td class="gutter"><pre><span class="line">1</span><br></pre></td><td class="code"><pre><span class="line"><span class="attr">theme:</span> <span class="string">butterfly</span></span><br></pre></td></tr></table></figure><p>并且安装相关的插件</p><figure class="highlight powershell"><table><tr><td class="gutter"><pre><span class="line">1</span><br></pre></td><td class="code"><pre><span class="line">npm install hexo<span class="literal">-renderer-pug</span> hexo<span class="literal">-renderer-stylus</span> <span class="literal">--save</span></span><br></pre></td></tr></table></figure><p>并且依据官方的建议把themes&#x2F;butterfly&#x2F;_config.yml复制到Hexo根目录并更名为_config.butterfly.yml。</p><p>接下来，我们执行命令</p><figure class="highlight powershell"><table><tr><td class="gutter"><pre><span class="line">1</span><br></pre></td><td class="code"><pre><span class="line">hexo clean &amp;&amp; hexo g &amp;&amp; hexo s</span><br></pre></td></tr></table></figure><p>我们就可以直接在自己浏览器上看到主题已经变为butterfly</p><h2 id="发布"><a href="#发布" class="headerlink" title="发布"></a>发布</h2><p>发布前需要在github新建一个项目，用来存储静态网页，并且生成站点。</p><h4 id="配置Git"><a href="#配置Git" class="headerlink" title="配置Git"></a>配置Git</h4><p>如果第一次需要设置用户名和邮箱:</p><figure class="highlight plaintext"><table><tr><td class="gutter"><pre><span class="line">1</span><br><span class="line">2</span><br></pre></td><td class="code"><pre><span class="line">git config --global user.name &quot;your username&quot;</span><br><span class="line">git config --global user.email &quot;your email&quot;</span><br></pre></td></tr></table></figure><p>生成公钥</p><figure class="highlight powershell"><table><tr><td class="gutter"><pre><span class="line">1</span><br></pre></td><td class="code"><pre><span class="line">ssh<span class="literal">-keygen</span> <span class="literal">-t</span> rsa</span><br></pre></td></tr></table></figure><p>在当前用户目录下进入.ssh文件夹能发现id_rsa.pub。在github上添加Deploy keys，把id_rsa.pub内容复制进去即可。</p><p>最后可以测试一下连接</p><figure class="highlight powershell"><table><tr><td class="gutter"><pre><span class="line">1</span><br></pre></td><td class="code"><pre><span class="line">ssh <span class="literal">-T</span> git@github.com</span><br></pre></td></tr></table></figure><p>如果测试成功，会有成功的回复。</p><h4 id="配置hexo发布插件"><a href="#配置hexo发布插件" class="headerlink" title="配置hexo发布插件"></a>配置hexo发布插件</h4><p>修改_config.yml，把仓库地址配置为之前生成的项目地址</p><figure class="highlight yaml"><table><tr><td class="gutter"><pre><span class="line">1</span><br><span class="line">2</span><br><span class="line">3</span><br><span class="line">4</span><br></pre></td><td class="code"><pre><span class="line"><span class="attr">deploy:</span></span><br><span class="line">  <span class="attr">type:</span> <span class="string">git</span></span><br><span class="line">  <span class="attr">repository:</span> <span class="comment"># 你的仓库地址，例如：git@github.com:&lt;用户名&gt;/ivoryforest.git</span></span><br><span class="line">  <span class="attr">branch:</span> <span class="comment"># 分支 例如：master</span></span><br></pre></td></tr></table></figure><p>配置正确，然后执行命令</p><figure class="highlight powershell"><table><tr><td class="gutter"><pre><span class="line">1</span><br><span class="line">2</span><br><span class="line">3</span><br></pre></td><td class="code"><pre><span class="line">hexo clean</span><br><span class="line">hexo g  <span class="comment"># 编译生成</span></span><br><span class="line">hexo d  <span class="comment"># 发布</span></span><br></pre></td></tr></table></figure><p>如果没出问题的话，即可看到github项目中已经有内容了。（如果有问题多半是网络的问题）</p><h4 id="生成站点"><a href="#生成站点" class="headerlink" title="生成站点"></a>生成站点</h4><p>通过点击项目setting -&gt; pages 可以配置静态站点，如果是你免费会员，那么该项目必须是public的。</p><p>默认站点名称为https:&#x2F;&#x2F;&lt;用户名&gt;.github.io&#x2F;&lt;项目名&gt;，如果你想以根目录结尾，不显示项目名，那么你的项目名需要为(&lt;用户名&gt;.github.io)。</p><h2 id="结尾"><a href="#结尾" class="headerlink" title="结尾"></a>结尾</h2><p>到目前为止，你就拥有一个精美的个人网站了，但是维护好还需要坚持。</p>]]></content>


    <summary type="html">&lt;h2 id=&quot;简介&quot;&gt;&lt;a href=&quot;#简介&quot; class=&quot;headerlink&quot; title=&quot;简介&quot;&gt;&lt;/a&gt;简介&lt;/h2&gt;&lt;p&gt;Hexo 是一个快速、简洁且高效的博客框架。Hexo 使用 Markdown（或其他渲染引擎）解析文章，在几秒内，即可利用靓丽的主题生成静态</summary>


    <category term="个人博客" scheme="https://ivoryforest.github.io/categories/%E4%B8%AA%E4%BA%BA%E5%8D%9A%E5%AE%A2/"/>
    
    
    <category term="hexo" scheme="https://ivoryforest.github.io/tags/hexo/"/>
    
    <category term="butterfly" scheme="https://ivoryforest.github.io/tags/butterfly/"/>
    
    <category term="github" scheme="https://ivoryforest.github.io/tags/github/"/>
    
  </entry>
  
  <entry>
    <title>Hello World</title>
    <link href="https://ivoryforest.github.io/hello-world.html"/>
    <id>https://ivoryforest.github.io/hello-world.html</id>
    <published>2022-08-12T16:24:26.645Z</published>
    <updated>2022-08-12T16:24:26.647Z</updated>
    
    <content type="html"><![CDATA[<p>Welcome to <a href="https://hexo.io/">Hexo</a>! This is your very first post. Check <a href="https://hexo.io/docs/">documentation</a> for more info. If you get any problems when using Hexo, you can find the answer in <a href="https://hexo.io/docs/troubleshooting.html">troubleshooting</a> or you can ask me on <a href="https://github.com/hexojs/hexo/issues">GitHub</a>.</p><h2 id="Quick-Start"><a href="#Quick-Start" class="headerlink" title="Quick Start"></a>Quick Start</h2><h3 id="Create-a-new-post"><a href="#Create-a-new-post" class="headerlink" title="Create a new post"></a>Create a new post</h3><figure class="highlight bash"><table><tr><td class="gutter"><pre><span class="line">1</span><br></pre></td><td class="code"><pre><span class="line">$ hexo new <span class="string">&quot;My New Post&quot;</span></span><br></pre></td></tr></table></figure><p>More info: <a href="https://hexo.io/docs/writing.html">Writing</a></p><h3 id="Run-server"><a href="#Run-server" class="headerlink" title="Run server"></a>Run server</h3><figure class="highlight bash"><table><tr><td class="gutter"><pre><span class="line">1</span><br></pre></td><td class="code"><pre><span class="line">$ hexo server</span><br></pre></td></tr></table></figure><p>More info: <a href="https://hexo.io/docs/server.html">Server</a></p><h3 id="Generate-static-files"><a href="#Generate-static-files" class="headerlink" title="Generate static files"></a>Generate static files</h3><figure class="highlight bash"><table><tr><td class="gutter"><pre><span class="line">1</span><br></pre></td><td class="code"><pre><span class="line">$ hexo generate</span><br></pre></td></tr></table></figure><p>More info: <a href="https://hexo.io/docs/generating.html">Generating</a></p><h3 id="Deploy-to-remote-sites"><a href="#Deploy-to-remote-sites" class="headerlink" title="Deploy to remote sites"></a>Deploy to remote sites</h3><figure class="highlight bash"><table><tr><td class="gutter"><pre><span class="line">1</span><br></pre></td><td class="code"><pre><span class="line">$ hexo deploy</span><br></pre></td></tr></table></figure><p>More info: <a href="https://hexo.io/docs/one-command-deployment.html">Deployment</a></p>]]></content>


    <summary type="html">&lt;p&gt;Welcome to &lt;a href=&quot;https://hexo.io/&quot;&gt;Hexo&lt;/a&gt;! This is your very first post. Check &lt;a href=&quot;https://hexo.io/docs/&quot;&gt;documentation&lt;/a&gt; for</summary>


  </entry>
  
</feed>